We at Mobiuscode have been hard at work for some time developing our game Panic Mode. Panic Mode is a puzzle/simulation game, where the goal is to save the clumsy Pammies from various dangers like fire, explosion, flooding and freezing. The player can place down items that interact in various ways with its enviroment.

The stand-out feature of Panic Mode is a dynamic elemental system. But how do you visualise a complex system without sacrificing performance. Easy, we use Effect Coverage Maps! Effect Coverage Maps or ECMs is what we call our system of using a dynamically updating grid based texture in a custom shader graph. They are powerful and used in many of our games’ visuals. Let’s take our smoke effects as an example.
Cellular
First let me explain how our cellular elemental system works. The cellular system is not just one script but many of our game’s components working together to achieve the goal of dynamic and visual elements. This UML diagram shows this complexity:
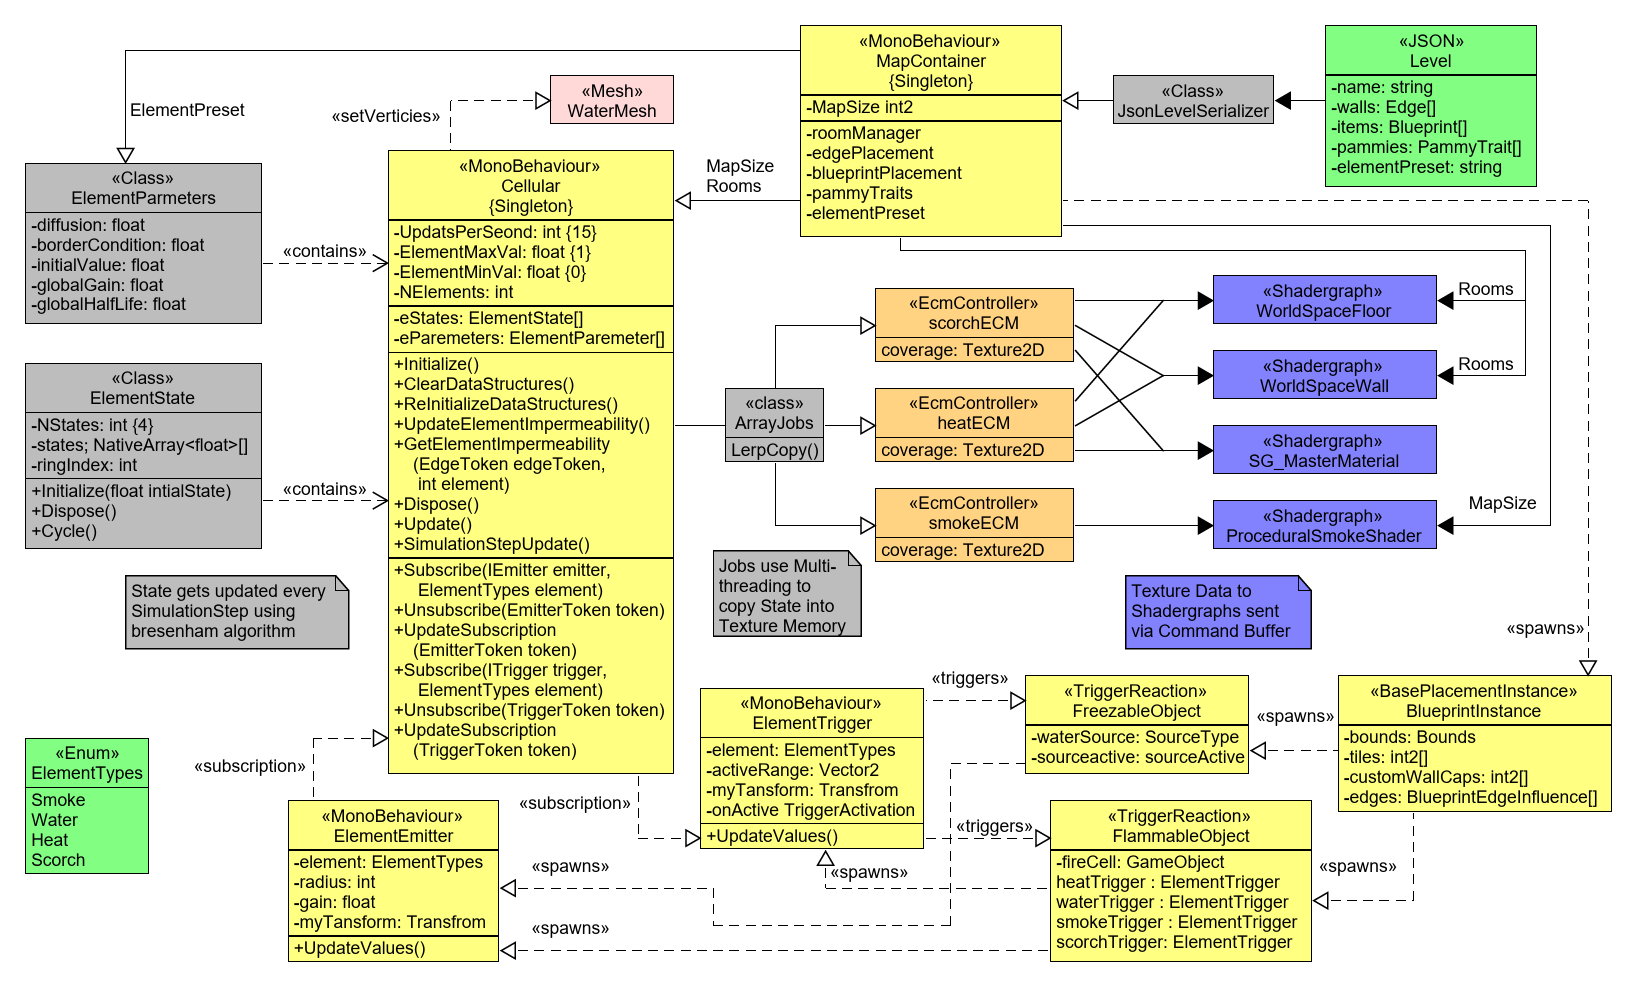
Our level is split up into a 2-dimensional grid, every tile can contain a piece of furniture, items, etc. and the space between the tiles can have walls that block movement and elements.
In the cellular system we store values between 0 and 1 for every tile in a custom NativeArray. Each Element (heat, water, smoke, etc) is stored separately. On each simulation step values are slowly equalised between neighbouring tiles, giving elements the ability to spread. Pammies and items can interact with the Cellular system using triggers and emitters. For example if a piece of furniture reaches a certain heat value, it catches on fire and will increase the smoke and heat values of the neighbouring tiles.
In order to display these values in an efficient way we have to send them to a shader graph which is calculated in the GPU rather than the CPU.
To do this we set up an EcmController as follows.
1
2
3
4
5
6
7
8
9
10
11
public EcmController(string identifier, float start = 0)
{
  var referenceId = $"_ECM{identifier}";
  Debug.Log($"Created CoverageMap {referenceId}");
  var size = Size;
  coverage = new Texture2D(size, size, TextureFormat.RFloat, false, false);
  FloodFill(start);
  var cb = new CommandBuffer();
  cb.SetGlobalTexture(referenceId, coverage);
  Graphics.ExecuteCommandBuffer(cb);
}
coverage is the 2D texture in which we will store the values of our grid as colour information. The texture is then loaded into a CommandBuffer in order to send it to the GPU.
Now we just need to update the values as they change.
1
2
3
4
5
  var sSmoke = eStates[(int) ElementTypes.Smoke];
  ArrayJobs.LerpCopy(sSmoke.State0, sSmoke.State1,
    smokeEcm.GetTextureMemory(), tInterpolation, 256)
    Complete();
  smokeEcm.coverage.Apply()
This is a code excerpt from the ‘Update’ function of our cellular script.
In it we load a NativeArray containing the last and current state of the smoke values into a variable. We then use a helper function to copy the values into the textureMemory of our EcmController. This helper function used the ‘C# Job System’, which utilises Multithreading making this operation extremely efficient. More information on ‘Jobs’ can be found in the Unity Docs.
We then apply our changes to the texture, which automatically uses the CommandBuffer to send the new values to the GPU. Note, that we slowly lerp between the last and current state of the value for a smoother transition, as the element calculation is done less often then frames are rendered.
Shadergraph
Now we have a texture containing the up to date smoke values. But how do we use this texture?
We create a custom shader graph. This shadergraph is called ProcedualSmokeShader and in the Blackboard of this shadergraph we have added this Texture2D variable.
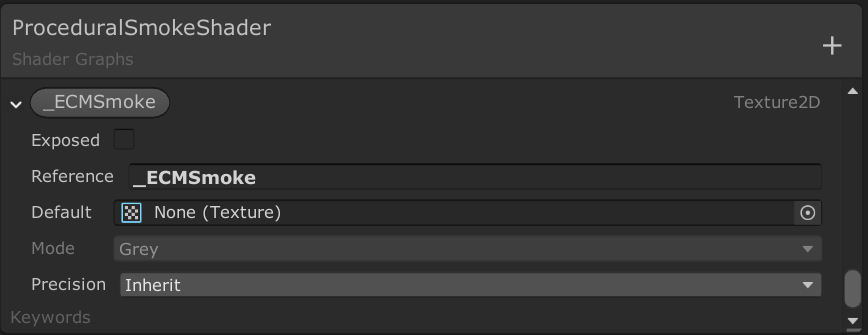
The reference is the same string as the identifier defined in the EcmController constructor.
Note that we disabled exposed variable. This disabled the default behaviour of shadergraphs, of manually assigning a texture, the shadergraph will instead look for any created texture in memory with its name matching the reference string.
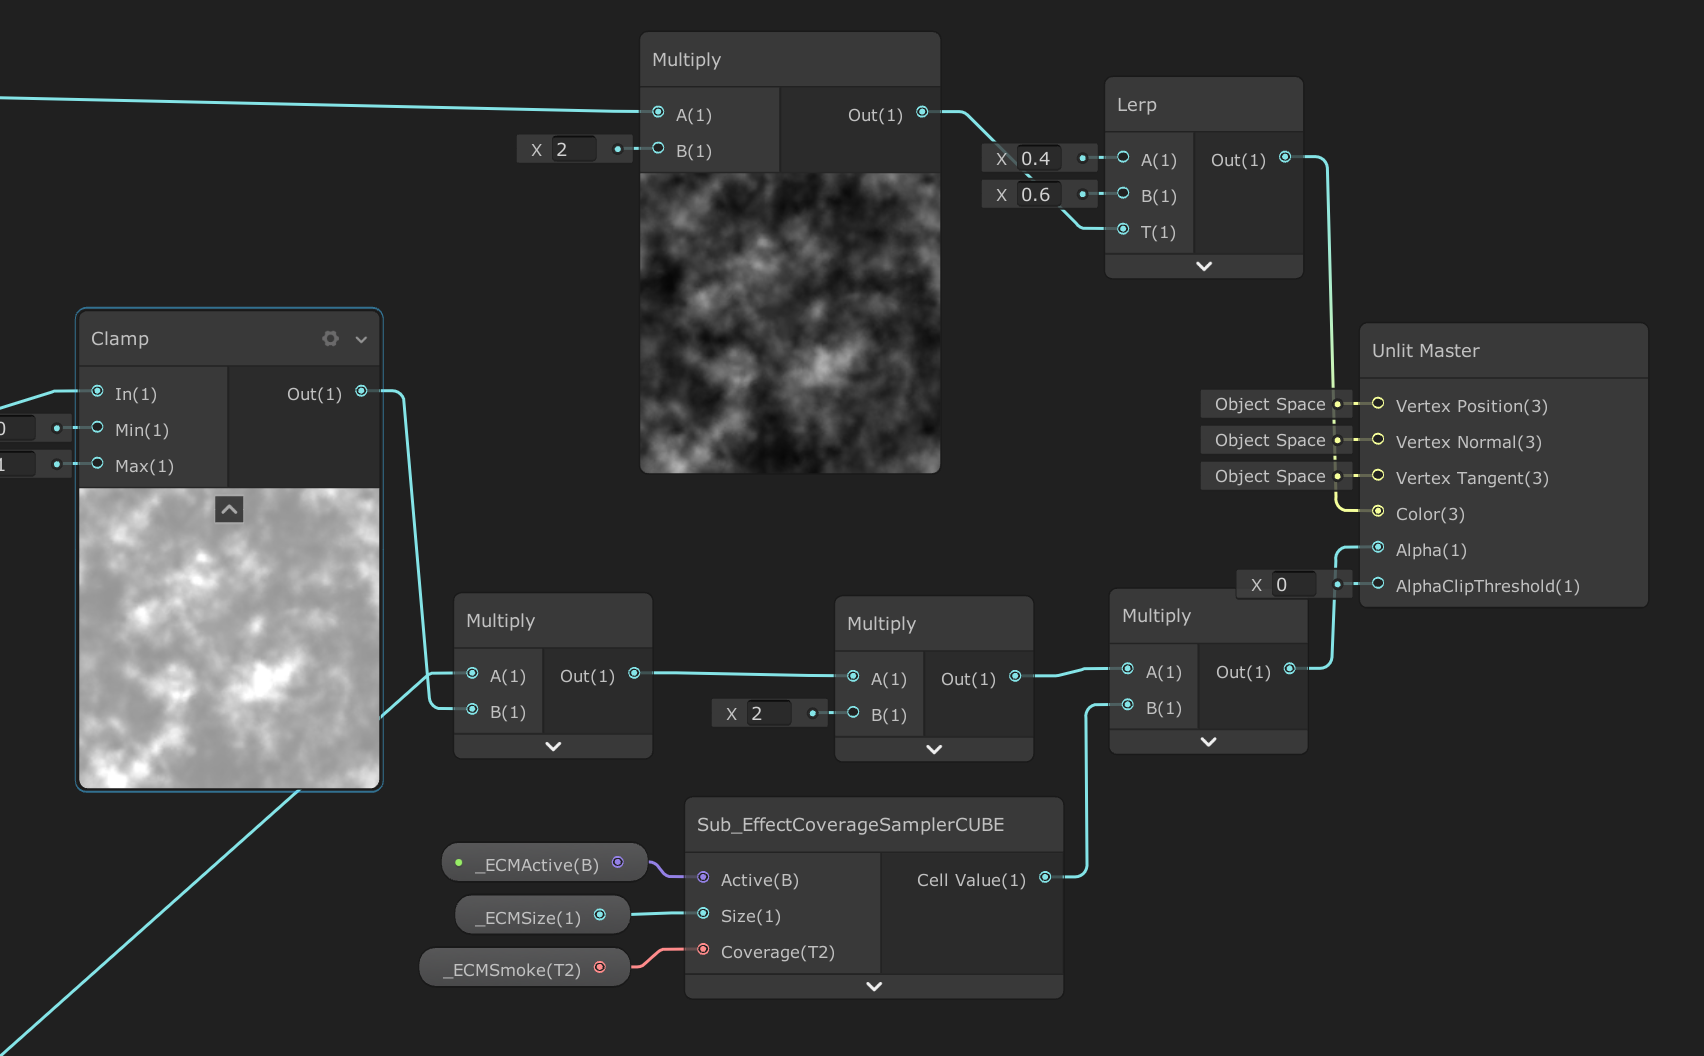
The texture is fed into the alpha value of our smokeshader using a sub shader that converts the colour information into a float value. We multiply it with the alpha value already used in the smoke texture. The UV of both the albedo and alpha of the smoke texture is tied to the game time., giving the smoke an illusion of movement.

In the subshader we tie the texture to the global world coordinates and use a custom function to convert and smooth the texture. The smoothing is done to avoid hard lines on tile borders where the values can change by a large amount.
The custom function we used was made by inigo quilez and can be found on their website. It is licensed under Creative Commons Attribution-ShareAlike 3.0 and can be used for free in any of your projects.
Scene
But what do we do with this shadergraph? It’s actually shockingly simple. We create a material and attach it to a simple plane within out level scene. The height of the plane is chosen to be high enough to not clip into furniture but low enough to look like the smoke is filling the room.

And that’s it! Simple yet effective smoke visuals.
I hope you enjoyed this look behind the scenes on our game Panic Mode! You can buy the game in early access on steam and be sure to look out for our next major update releasing in the coming months.